


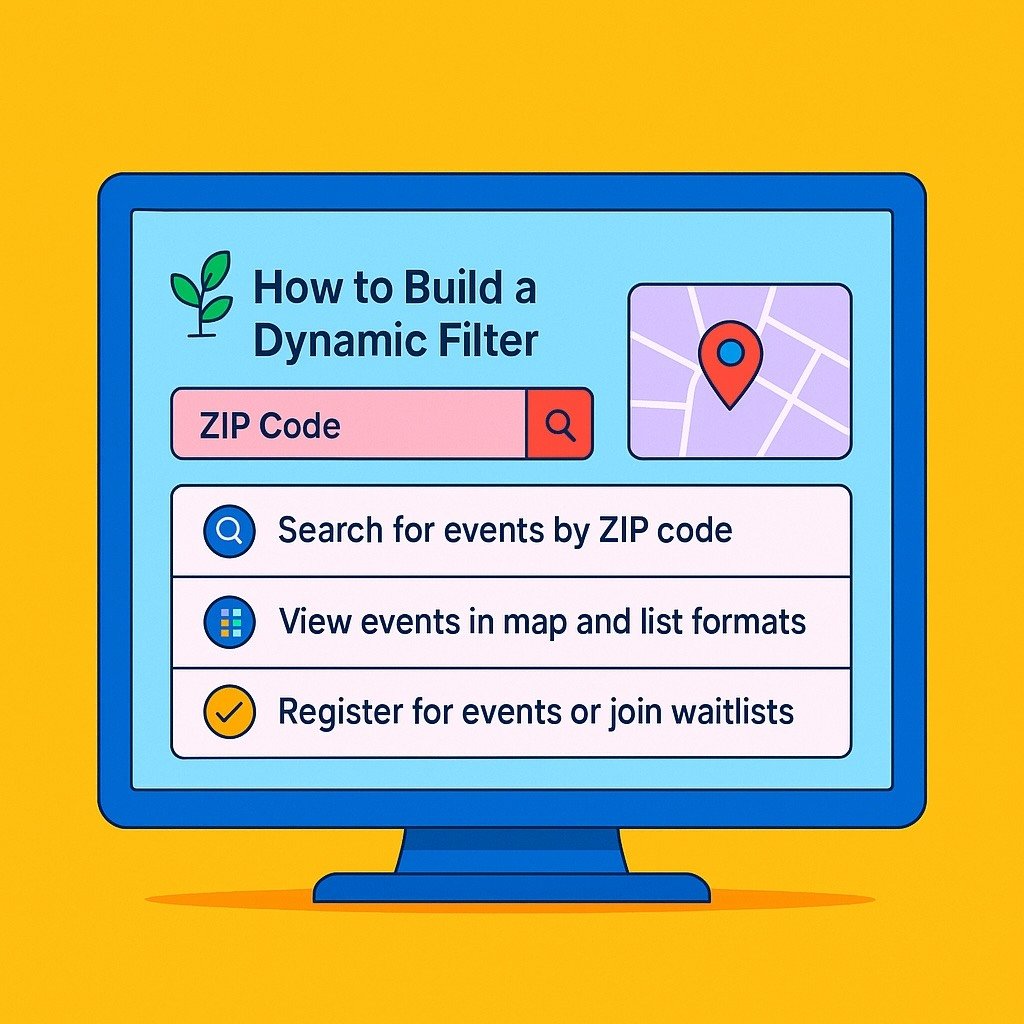

Overview
In this guide, we’ll walk through how to build a dynamic filter module using HubSpot Custom Objects. This flexible tool allows visitors to:
- Search for events by ZIP code within a chosen radius.
- View events in both map and list formats.
- Register for events or join waitlists if events are full.
- See custom messages when no events are found nearby.
This functionality is perfect for businesses that host regional events and want to improve user experience by making it easy to find nearby events through a customized filtering tool built on HubSpot Custom Objects.
Filter Visualization
Here’s a high-level breakdown of what we’ll build:
- Serverless Function to fetch event data stored in HubSpot Custom Objects.
- Search Interface to let users filter events by ZIP code and distance radius.
- JavaScript Functionality to handle user interaction and dynamic map/list rendering.
- HubSpot Module Configuration to make the Filter customizable in the HubSpot UI.
- CSS Styling to ensure the filter looks polished and works seamlessly on any device.
1. Serverless Function Setup (CRM Custom Objects Data Fetching)
We’ll use a HubSpot serverless function to retrieve event records from your HubSpot Custom Objects. This is a scalable solution that allows you to securely access HubSpot CRM data without exposing sensitive details on the front end.


filter.js - HubSpot Serverless Function Example:
const axios = require('axios');

exports.main = async (context, sendResponse) => {
  const headers = new Headers();
  headers.append("Access-Control-Allow-Origin", "*");
  headers.append("Content-Type", "application/json");
  headers.append("Authorization", "Bearer YOUR_BEARER_TOKEN");

  const fetchEvents = async () => {
    const today = new Date();
    const startDate = new Date(today);
    const endDate = new Date(today);
    endDate.setDate(today.getDate() + 28);

    let allResults = [];
    let hasMore = true;
    let after = undefined;

    while (hasMore) {
      const raw = JSON.stringify({
        filterGroups: [{
          filters: [{
            propertyName: "start_time",
            operator: "BETWEEN",
            value: startDate.toISOString(),
            highValue: endDate.toISOString()
          }]
        }],
        properties: [
          "id", "event_id", "venue_title",
          "latitude", "longitude", "venue_address_1",
          "venue_city", "venue_state", "venue_zip_code",
          "start_time", "event_status"
        ],
        after
      });

      const response = await fetch(
        "https://api.hubapi.com/crm/v3/objects/Your_Function_NAME_/search",
        {
          method: "POST",
          headers: headers,
          body: raw
        }
      );              const data = await response.json();
      allResults = allResults.concat(data.results || []);
      hasMore = !!data.paging?.next;
      after = data.paging?.next?.after;
    }

    return allResults;
  };

  const events = await fetchEvents();
  sendResponse({
    statusCode: 200,
    body: {
      events
    }
  });
};
Note: The Authorization header includes your Bearer token for secure access to HubSpot’s CRM API. Make sure to replace YOUR_BEARER_TOKEN with your actual token from HubSpot’s private app configuration. Learn more about Hubspot API's here.
2. Search Interface HTML Structure
The HTML structure forms the core of your search functionality. This includes a dropdown for radius selection, a ZIP code input field, a search button, and containers for displaying filtered results in both map and list views.
<script async src="https://maps.googleapis.com/maps/api/js?key=MAP_API_KEY&libraries=places,geometry"></script>
<div class="search-interface">
<div class="search-controls">
<select id="radius-select" class="hs-select">
<option value="5">5 miles</option>
<option value="20" selected>20 miles</option>
<option value="30">30 miles</option>
</select>
<input type="text"
id="zip-input"
placeholder="Enter ZIP code"
pattern="\\d{5}"
title="5-digit ZIP code">
<button id="search-btn" class="hs-button">
Search Events
</button>
</div>
<div class="results-container">
<div class="map-view" id="map"></div>
<div class="list-view" id="events-list"></div>
<div class="no-results">
</div>
</div>
</div>
Tip: This layout is fully customizable through HubSpot's drag-and-drop editor when integrated as a custom module.
3. Core JavaScript Functionality
This JavaScript powers the dynamic filtering. It integrates with Google Maps for geolocation and mapping, fetches filtered event data from your serverless function, and dynamically updates the UI based on user search inputs.
async function performSearch() {
  const zip = document.getElementById('zip-input').value;
  selectedRadius = document.getElementById('radius-select').value;
  if (!zip) {
    alert('Please enter a ZIP code.');
    return;
  }
  try {
    const response = await fetch(`/_hcms/api/YOUR_CUSTOM_FUNCTION_JSON_NAME?zip=${zip}&radius=${selectedRadius}`);
    const events = await response.json();
    if (events.length === 0) {
      showNoResults();
      return;
    }
    const eventsWithDistances = calculateDistances(events, { lat: 39.8283, lng: -98.5795 });
    displayEvents(eventsWithDistances);
    plotEventsOnMap(eventsWithDistances, zip);

  } catch (error) {
    console.error('Search failed:', error);
    showErrorState();
  }
}

function displayEvents(events) {
  const eventList = document.getElementById('event-list');
  eventList.innerHTML = '';

  if (events.length === 0) {
    eventList.innerHTML = '<p>No events found within the selected radius.</p3>';
    return;
  }

  events.forEach(event => {
    const eventElement = document.createElement('div');
    eventElement.classList.add('event');

    eventElement.innerHTML = `
 <h3>${event.name}</h3>
  <p><strong>Description:</strong> ${event.description}</p>
  <p><strong>Distance:</strong> ${event.distance.toFixed(2)} miles</p>
  <p><strong>Location:</strong> ${event.location}</p>
  <hr>
    `;

    eventList.appendChild(eventElement);
  });
}

function showNoResults() {
  const eventList = document.getElementById('event-list');
  eventList.innerHTML = '<p>No events found within the selected radius.</p>';
}

function showErrorState() {
  const eventList = document.getElementById('event-list');
  eventList.innerHTML = '<p>Error occurred while fetching events. Please try again later.</p>';
}
Pro tip: You can further customize the displayEvents()
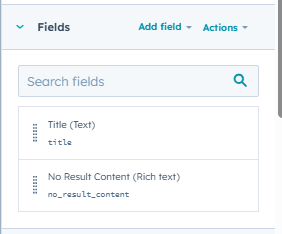
4. HubSpot Module Configuration
Customize fields in your module.
5. CSS for a Responsive Filter
This CSS ensures the functionality looks great on both desktop and mobile devices. Customize it further to fit your brand guidelines.
.search-interface {
  max-width: 1200px;
  margin: 0 auto;
  padding: 2rem;
}

.results-container {
  display: grid;
  grid-template-columns: 1fr 1fr;
  gap: 2rem;
  margin-top: 2rem;
}

.map-view {
  height: 600px;
  border-radius: 12px;
  box-shadow: 0 4px 6px rgba(0,0,0,0.1);
}

.event-card {
  padding: 1.5rem;
  background: #fff;
  border-radius: 8px;
  margin-bottom: 1rem;
  box-shadow: 0 2px 4px rgba(0,0,0,0.05);
}

@media (max-width: 768px) {
  .results-container {
    grid-template-columns: 1fr;
  }
}
Suggestion: Tailor this CSS to create a unique, branded experience for your HubSpot functionality via Custom Objects.

Final Thoughts
By following this guide, you’ll be able to build a filter via HubSpot Custom Objects that helps your audience easily discover, register, or join waitlists for your events. The ZIP code filtering and customizable radius ensure they only see relevant events, improving the user experience and increasing registration rates.

Related Post
Find a Dealer/Store Locator: The Ultimate Guide to Building an Interactive Map Custom Module in HubSpot with Mapbox
In today's digital world, businesses need to make it easy for customers to find their stores or dealers. Whether you’re selling products through authorized dealers or running a chain of physical stores, a Find a Dealer/Store Locator module helps...

Securing Your Site: Setting Security Headers when migrating to HubSpot CMS
Discover the significance of implementing proper security headers in your domain settings and learn how to do it effectively in HubSpot.
How to upload a theme to your HubSpot CMS Portal
So you have the folder or zip for a theme that you like. Wondering how to install?
